Kategori
arduino 

- Basic servo
Basic servo control
In this tutorial, we will learn how to control a standard servo motor, to go back and forth across 180 degrees, using a
for loop(). This is done with the help of the Servo library, which is pre-installed library in the Arduino IDE (both offline and online versions).Last revision09/02/2022 In this tutorial, we will learn how to control a standard servo motor, to go back and forth across 180 degrees, using a for loop(). This is done with the help of the Servo library, which is pre-installed library in the Arduino IDE (both offline and online versions).
Note: This tutorial uses an Arduino UNO, but you can use any official Arduino board.
Hardware and software required
-
Arduino IDE (online or offline)
-
Arduino UNO (Link to store)
-
Servo motor 4.8V - 6V (Link to store)
-
Jumper wires.
Standard servo motors Standard servo motors are actuators that allow for precise control of position (angle). A typical characteristic is that the angle of the motor is 0 - 180 degrees. With other words, it can make one half of a rotation.
A standard servo motor, just as other motors, are essentially just a DC motor, but with some extra features:
- Control circuit for controlling the motor, e.g. setting the angle.
- Gears that transform speed into torque, which makes it capable of doing "heavy lifting" at a slower speed, as opposed to a regular DC motor that just spins very fast!
- Potentiometer that keeps track of its angle. This makes it possible for the servo to "know where it is". Take a look at the image below to see how a Servo looks like inside:
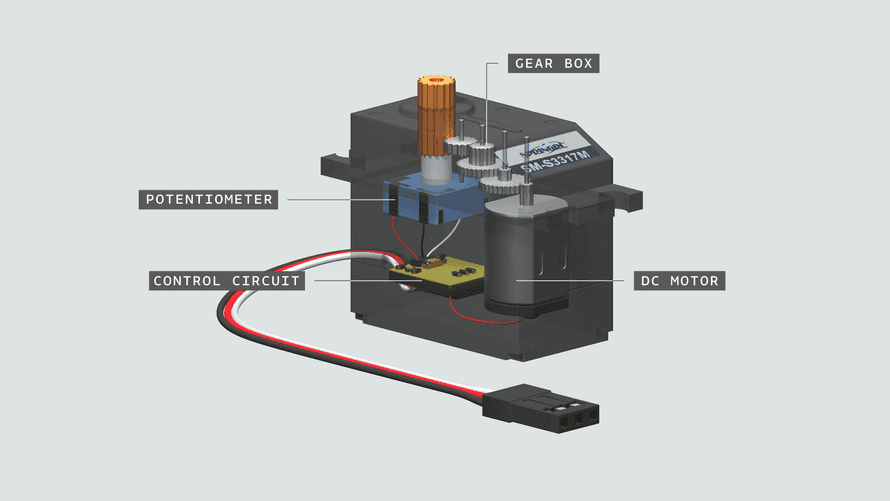 servo
servoThe different wires Almost all servos come with a set of 3 wires. These are PWR, GND and Signal. For a very simple circuit, all that is needed is to connect each of these two pins on the Arduino:
- PWR (RED) - connects to 5V on the Arduino.
- GND (BLACK) - connects to GND on the Arduino.
- Signal (WHITE) - connects to a digital pin on the Arduino (typically 9). Note: The color combination varies from servo to servo, but typically the red and black remains.
Note: Depending on what Arduino you are using, the signal pin may vary.
Circuit Simply connect the standard servo motor to the Arduino, following the circuit below:
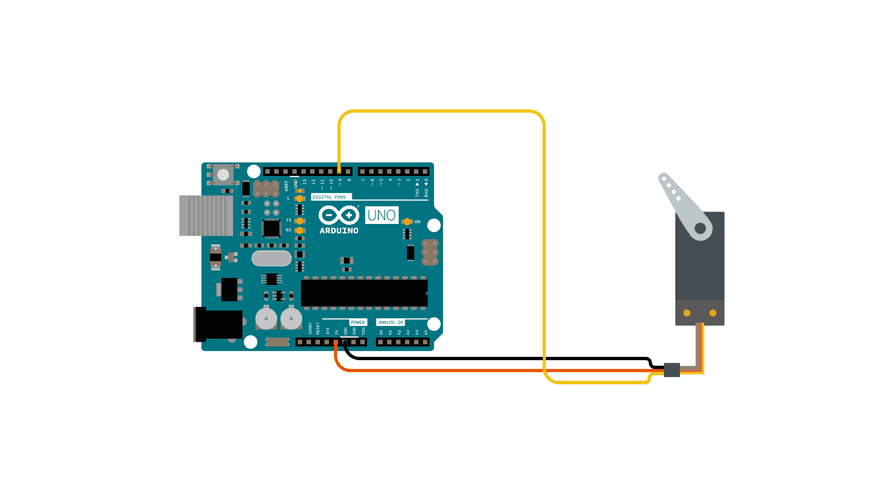 circuit
Programming the board
To program the board, you will need to have installed the offline editor, or use the online editor. There's no need to install any external libraries.
Before we begin, let's take a look at some of the core functions in the program:
- #include <Servo.h> - includes the Servo library.
- Servo myservo - create a servo object.
- myservo.attach(9) - attach the servo to a pin.
- myservo.write(pos) - write a value to the servo (0-180).
The code can be found by navigating to File > Examples > Servo > Sweep, or can be copied directly from below. Upload the program to the board.
#include <Servo.h>

Servo myservo;  // create servo object to control a servo
// twelve servo objects can be created on most boards

int pos = 0;    // variable to store the servo position

void setup() {
  myservo.attach(9);  // attaches the servo on pin 9 to the servo object
}

void loop() {
  for (pos = 0; pos <= 180; pos += 1) { // goes from 0 degrees to 180 degrees
    // in steps of 1 degree
    myservo.write(pos);              // tell servo to go to position in variable 'pos'
    delay(15);                       // waits 15ms for the servo to reach the position
  }
  for (pos = 180; pos >= 0; pos -= 1) { // goes from 180 degrees to 0 degrees
    myservo.write(pos);              // tell servo to go to position in variable 'pos'
    delay(15);                       // waits 15ms for the servo to reach the position
  }
}
Testing it out After we have successfully uploaded the code to the board, the standard servo should now start moving from 0 - 180, and then start moving from 180 - 0. This is due to the two for loops in the program, which gradually increases the pos variable, which is written to the servo.
 servo-basic-angle
Congratulations! That was just a few easy steps to get started with standard servo motors. Now that you have this working, you can start exploring a lot of different cool projects that uses servo motors, and perhaps start making your very own robot!
Conclusion Congratulations! That was just a few easy steps to get started with standard servo motors. Now that you have this working, you can start exploring a lot of different cool projects that uses servo motors, and perhaps start making your very own robot!
Feel free to explore the Servo further.
Contoh Berikut contoh dasar pemrograman servo menggunakan Arduino dan pustaka
Servo.h. Program ini akan menggerakkan servo dari 0° ke 180° dan kembali ke 0° secara bertahap.Kode Arduino:
#include <Servo.h>  // Mengimpor pustaka Servo

Servo myServo;  // Membuat objek servo

void setup() {
    myServo.attach(9);  // Menghubungkan servo ke pin 9
}

void loop() {
    // Gerakkan servo dari 0° ke 180°
    for (int pos = 0; pos <= 180; pos += 1) {
        myServo.write(pos);  // Set posisi servo
        delay(15);  // Tunggu 15ms agar servo bergerak
    }

    // Gerakkan servo dari 180° ke 0°
    for (int pos = 180; pos >= 0; pos -= 1) {
        myServo.write(pos);
        delay(15);
    }
}
Penjelasan:
-
#include <Servo.h>→ Mengimpor pustaka Servo. -
Servo myServo;→ Membuat objek servo. -
myServo.attach(9);→ Menghubungkan servo ke pin 9 Arduino. -
myServo.write(pos);→ Mengatur posisi servo ke derajat tertentu. -
delay(15);→ Menunggu sebelum mengubah posisi untuk menghindari pergerakan yang terlalu cepat.
Kode ini akan membuat servo bergerak bolak-balik antara 0° dan 180°. 🚀
-